05 Jan 2019
by harmonyrichman
in Crafts
Tags: at home, craft, imperfect, paint, pallet, rustic, sign, wood
I’ve been completely consumed with teaching and have had minimal time for any projects but when I do it’s gotta be in bits and pieces. This past summer we had gotten some blocks for our yard and they were on a nice pallet. I kept the pallet knowing I wanted to do something with it. I decided to make some fun signs.

For my kitchen, my niece and I always bake and dance so this fits perfect!
My niece and I went to taking apart the pallet on a hot summer day. I cut the nice planks down to size then sanded.
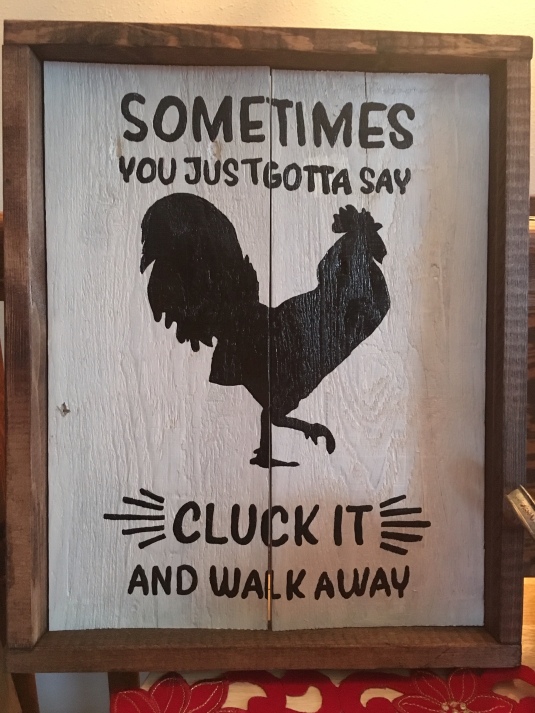
For my sister for Christmas, she has a flock of egg-laying chickens!
For each project I used an antique white paint from Michels. Finding fun fonts I downloaded the fonts and printed as big as I wanted. Centered them as needed and used a ballpoint pen to outline my words. This was tough as sometimes the wood would not imprint.
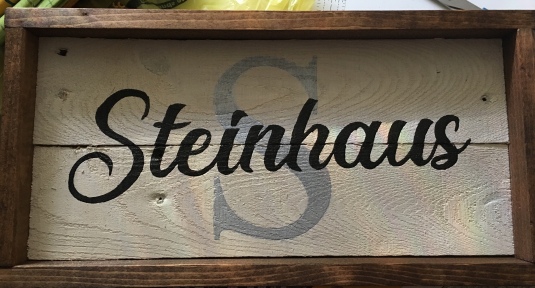
Made for my brother for his new house, I didn’t grab a photo of the dark border, bummed!
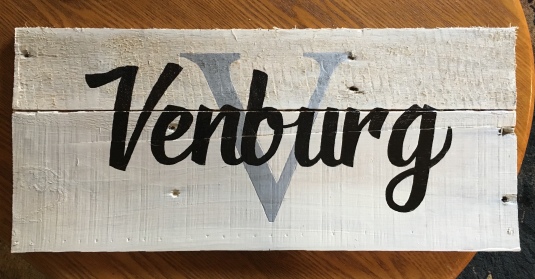
For my sister-in-law and her husband for Christmas!
Using an oil-based sharpie paint pen, outlined my imprint and colored in. I finally used bargain wood from Menards with a dark stain to make the border. I love each of my projects and can’t wait to experiment more!
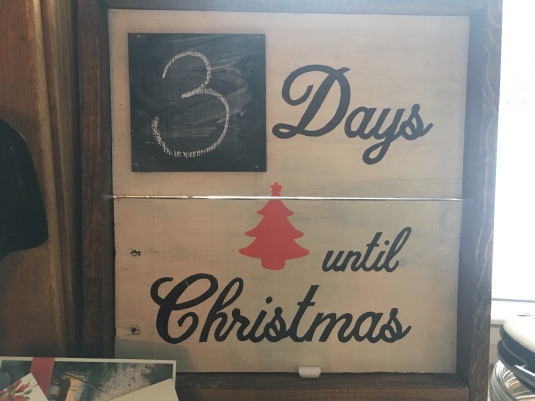
Th one below I used a square piece of wood and painted the wood with chalkboard paint so that I could make it an interactive board. I kept this for myself!
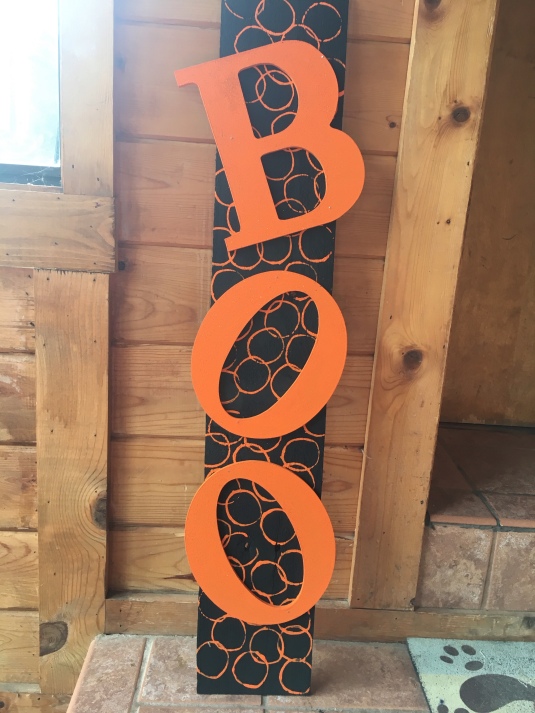
This final project I bought pre-made wood letters. My niece helped me paint the whole thing black and out letters sparkly orange! We then used a cardboard toilet paper roll and dipped it in orange paint and dabbed on the black portion. I used a staple gun to tack the letters on.
02 Aug 2017
by harmonyrichman
in Crafts
Tags: antlers, deer, feathers, handmade, hunter, pheasant, wreath
My husband has A LOT of pheasant feathers and by a lot, I mean a large collection as he keeps tail feathers from each pheasant he takes down…it adds up quickly.
Further, he has quite a bit of random sets of deer antlers hanging around the garage.
I thought perhaps I could persuade him to let me use them in a project for the house. He obliged and even cut apart the antlers for me so that I could work with them more easily.
I headed to Michaels and got some supplies…
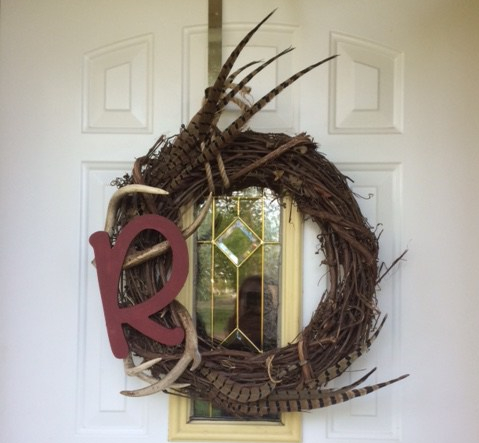
I started first by painting the “R” with acrylic paint with a couple of coats. While this dried, I placed the antlers. They are held in place with craft wire. I then inserted the feathers. Most are loose stuck into the wreath; however, some I used hot glue to secure down.
Hot glue didn’t work to keep the “R” securely fastened so I used JB Weld and that baby hasn’t moved a bit! I used a basic rope I found in the garage, cut it, for the string to hang.
The only thing I wish I could do was balance it a little bit more. There is quite a bit of weight on the left side there and so it’s a little strange to hang, but overall was awesome to make!
02 Aug 2017
by harmonyrichman
in Sewing
Tags: fabric, hexagon, homemade, moda, pattern, table runner, table topper, triangles
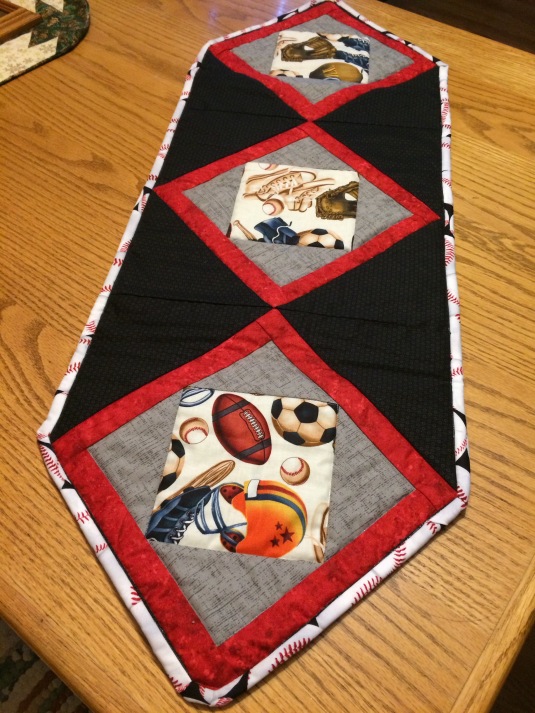
Where has summer gone? I feel like we just started summer and am all of a sudden realizing that school starts in just 20 days and I have SO much planning to do! I haven’t been able to get in very many sewing projects; however, I have some cute things planned for after when school starts for Halloween for my itty bitty niece!
More
23 Apr 2017
by harmonyrichman
in Cross-stitching
Tags: baby, bibs, Cinderella, cross stitch, gift, hand made, pillow, princess
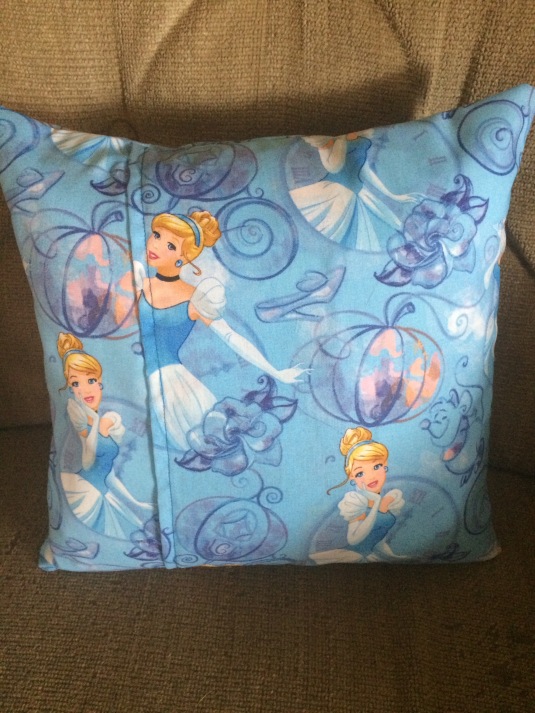
A friend of mine is having a baby and she is simply glowing full of sunshine!
I’ve been working on a few things for her; however, teaching interrupts the best of intentions! She stated the baby’s theme will be Cinderella! I found this adorable cross stitch quote from this Etsy shop. I paired with white Aida fabric and turned into a cute 12″ X 12″ envelope pillow, complete with Cinderella themed fabric from fabric.com.

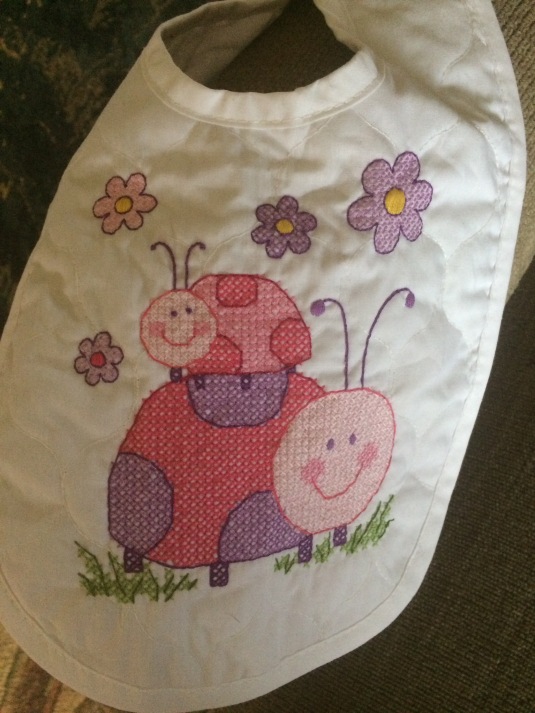
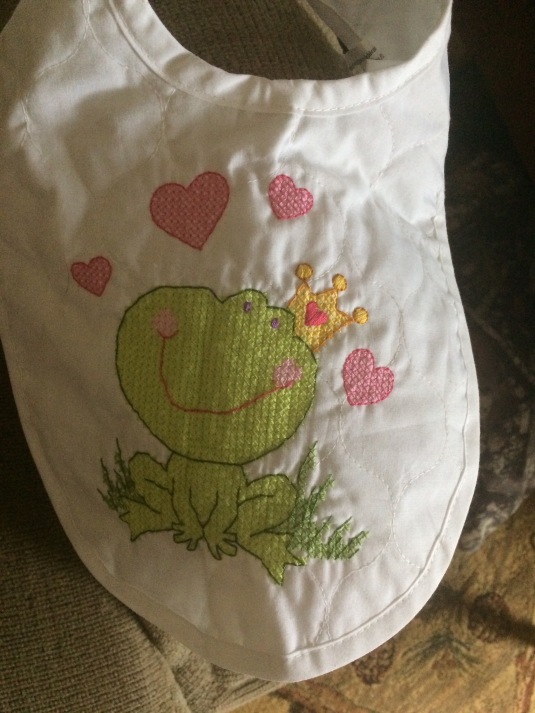
However I had first made a pit stop at Michaels arts and craft store and saw these bibs that appear to be “princess” themed and completed these quickly over the December holiday break. The brand for these are both Dimensions. All together I hope she likes her gift which will be mailed tomorrow!
26 Feb 2017
by harmonyrichman
in Crafts, Sewing
Tags: handmade, my pillow, outdoors, pillow, pillowcase, travel
Last month when my boss was visiting my office he noticed my awesome math pillows that I had made. He was mesmerized and asked if I were for hire? I told him that Incould be. He further explained that he just loves his “My Piilows” and was in need of some travel size cases. I told him I’d think about it.
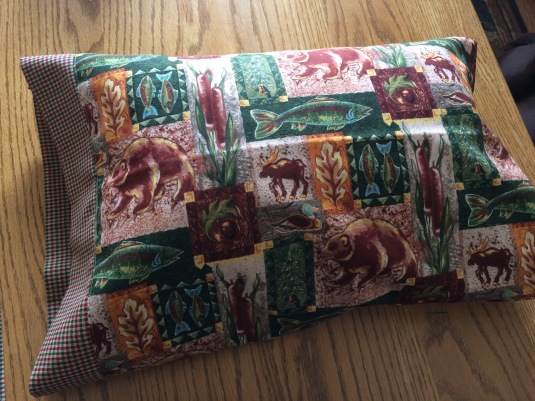
Now my boss is of the outdoorsy type so while shopping at JoAnn’s I found some cute outdoorsy fabric combo. I have at home a couple of travel “My Pillows” with the plain pillowcases so used that as my template.
I cut a 19″ x 28.5″ piece of main fabric and a 5″ x 28.5″ piece of matching fabric.
I folded the matching fabric and pressed in half the “hotdog” way, wrong sides together.
Then pinned the raw side of the matching fabric to the long side of the main fabric, right sides together. Sewed using a 1/2″ seam allowance. and then pressed towards the main fabric. Followed up with a top stitch, about a 1/4″ below my seam.
Finally matching right sides together, I pinned together 2 of the remaining sides, sewing a 1/2″ seam, unpinned and went back over and zigzagged stitched to prevent fraying since I don’t have a serger.
Turned right side out and pressed!
I matched them up to the “My Pillow” brand pillowcase and it was a perfect match! Adding in the pillow, the case seems a little big, but I think it looks ok!
From the moment I started cutting until I did my last clip, took me about 30 minutes to complete bo cases. I hope that my boss likes his surprise when they arrive at his office later this week.
24 Jan 2017
by harmonyrichman
in Baking, Low Carb
Tags: Baking, brownie, healthy, journey, Low Carb, my journey, recipes, strawberry, weight loss, yummy
My weight-loss journey has certainly been a LONG journey, started well over 2 years ago. I started on my own with just exercise and watching what I ate, I lost about 25 pounds on my own. Last summer, running regularly and eating the good parts of the food pyramid, I started gaining weight and was confused, flustered, angry and depressed. Instead of giving up, I talked with my family doctor who advised me to speak with some kind of specialist who lives a live style that is low in carbs. What did I have to loose? So, I went to see Dr. Leah, and she set me up on living Low Carb and it’s hard, every day is HARD, but it has been the most rewarding and educational journey I’ve ever been on! She has taught me some amazing LIFE LONG skills that can keep this going for me forever! What I enjoy most is I get to eat regular people food every single day. I don’t have any special foods I have to buy from some specialized location, it’s normal grocery store food. It doesn’t cost me any more than it did before, because frankly, I’m a teacher, I don’t have a whole lot extra to fork over.

More
07 Jan 2017
by harmonyrichman
in Sewing
Tags: 1, 1st birthday, 3 tiered dress, applique, aunt, baloons, birthday, dress, homemade, I made this, niece, pink, ruffle dress, Sewing
Oh my goodness, I can’t even begin to tell you how much I love being an auntie! Joey and I do not plan on having children of our own and my siblings aren’t married, nor do they have children. On Joey’s side, his sister, had a baby, Allison. And she is the cutest little thing I have ever met. Thankfully she lives in the house next to ours so we are blessed to see her quite often. I asked my sister-in-law if it would be okay if I made her birthday dress and I can’t even get enough of it!
More
18 Dec 2016
by harmonyrichman
in Sewing
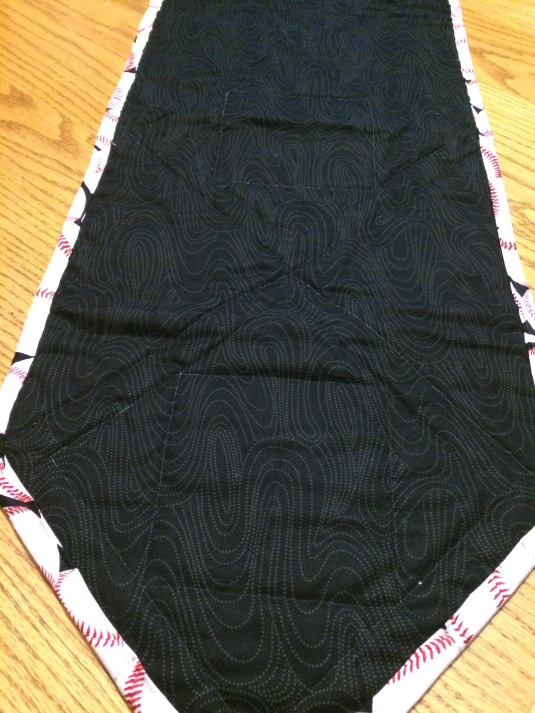
Tags: baseball, gift, homemade, invisible thread, Sewing, table runner
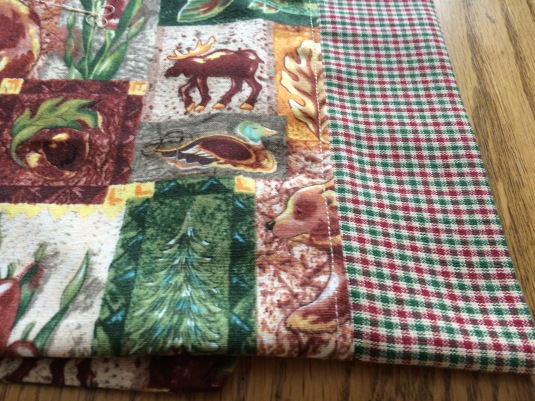
Every summer you can usually find me and usually my husband hanging out at the FM RedHawks baseball field! There’s just something so relaxing watching baseball on a hot summer day! Well there is a gentleman who I had met working my part time job many years ago and we became pretty close. Every year he gives us oodles of tickets to the RedHawks games. Now this guy is very well off and never wants anything in return. Last year I gave home some of our homemade salsa and jelly. This year I made him a baseball themed table runner. As a bachelor, I really hope he likes it!

I found the fabric and pattern at this really cute fabric store in Devils Lake, ND this past September.
I didn’t realize how wide this was going to turn out until I started piecing it together and thought it looked odd. With some minor tweaking I made it to more my liking/size. I used the invisible thread again as well as the basting spray when layering, just love it! I hope Mike does too!!
23 Oct 2016
by harmonyrichman
in Crafts, Sewing
Tags: auntie, christmas gift, Dr.Seuss, dress, niece, pattern, picnic dress, reading, ric rack, Sewing, summer
Last week or so I made this adorable little fish for my niece for Christmas. I have decided that we should have a theme for her for Christmas and went to work finding a pattern to see a amatchihg dress for her fish. I settled on a Dr. Seuss theme.
I found the picnic dress pattern from the Cottage Mama here: http://thecottagemama.com/2012/07/summer-picnic-dress-free-pdf-pattern/
I found my fabric and ric rack at http://www.fabric.com.
The dress sizes were either 12 month or 2T, so when cutting out the pattern I drew a line in between the 12 month and 2T lines for something that will be a suitable size for her in the spring/summer.
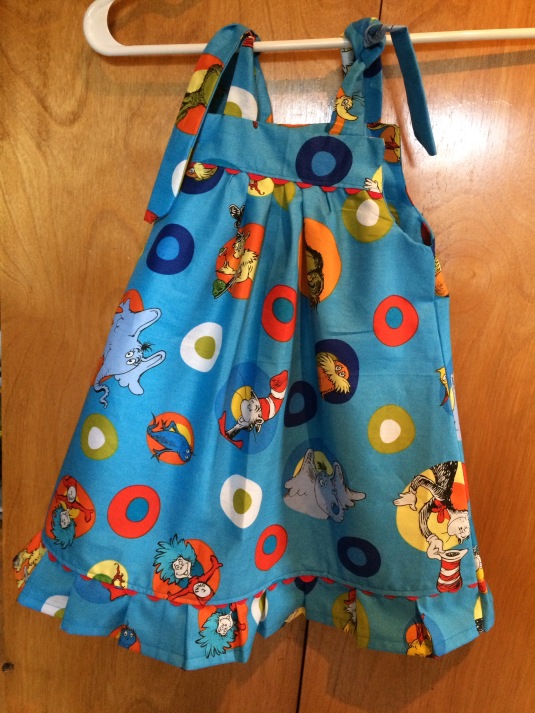
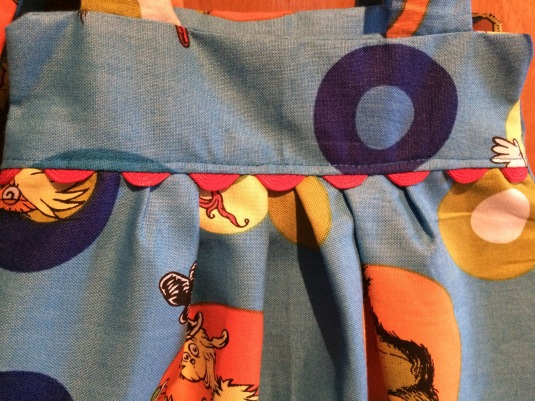
The pattern was easy to cut out from the 1-yard of fabric I purchased. It took me roughly 45 minutes to prep and cut all the fabric. I didn’t quite have enough fabric for the bottom ruffle as outlined in the directions for the gathering technique described, so rather I used what I had and made pleat like portions for the ruffle.
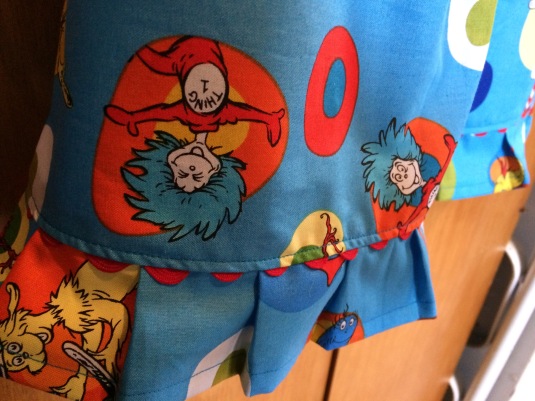
I also put my pieces together differently than as directed. I completed the bodice and yolk parts as instructed; however I attached the ruffle first before sewing the front to the back of the dress. I had no problems attaching this way. I als,o had extra ric rack from the top so I added ric rack to just above the ruffle. Now that I think of it, adding a pocket to this dress would be so adorable!
My aunt was an elementary school librarian before she passed while I was in my senior year student teaching of my undergrad degree. She was my inspiration for becoming a teacher and highly influential. Growing up she insisted on giving books for Christmas and really is my reason for loving to read as much as I do now. I am determined to be that “educational” auntie for my niece Allie! So with her dress and fish she will also be getting her very first set of Dr. Seuss books. I can imagine now hanging out this summer reading to her in the grass under the sun with her picnic dress on!
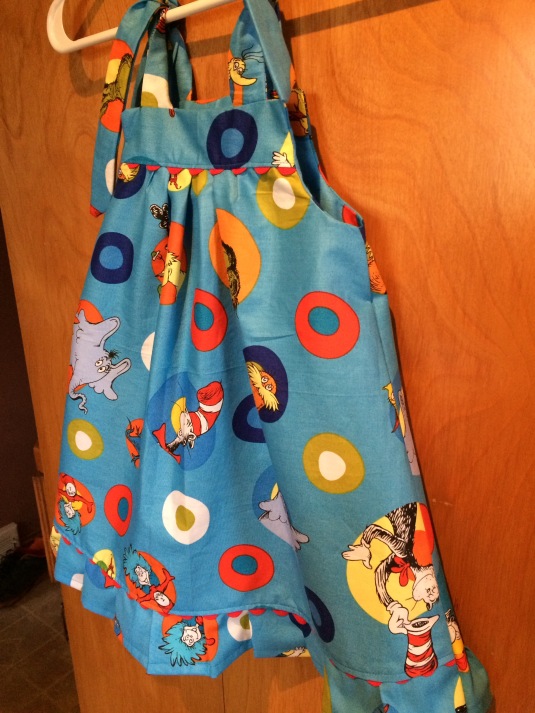
Overall the pattern and directions were really easy to follow. The dress itself took me around 2.5 hours from start to finish because I’m slow and wanted to take my time. I’m also pretty proud of the nice straight lines I top stitched, certainly getting better and better!! I love the tie straps so that are flexible for the summer as she grows! My mom pointed out that she could wear with some cute leggings and a sweater during the cooler parts of spring/summer. I hope my sister in law finds this as cute as I do!
Previous Older Entries


